Ansible – VMware Identity Manager deployment through vRealize Suite Lifecycle Manager – Part#1

Today i’m going to show you how to create new environment for Vmware Identity Manager and install new instance of vIDM in vRealize Suite Lifecycle Manager in fully automaticaly way, using of course Ansible.
In VMware docs you will find that you can add an existing VMware Identity Manager OR deploy new VMware Identity Manager through vRealize Suite Lifecycle Manager. So i read many articles and blogs but it’s really hard to find anythink about installation new vIDM through vRSLCM using REST API.

Digging on the internet i came across a great article wrote by Gavin Stephens on his own blog SimplyGeek.co.uk. He describes in details deployment process of vIDM from OVA using Ansible playbooks.
So much for introduction, let’s talk about the case.
NOTE!!!
Deployment of an Identity Manager through vRLSCM is through a single node with an Internal PostgreSQL database embedded in the appliance and does not support an external database like Microsoft SQL. vRSLCM does not perform cluster-based installations of VMware Identity Manager. More info in VMware docs.
What is worthy to mention is that VMware recommends external Microsoft SQL Server database for vIDM environment what really suprised me.
An internal Postgres SQL database is embedded in the VMware Identity Manager appliance, but the internal database is not recommended for use with production deployments. Read more…
Ok before we start install vIDM through LCM, first we have to configure product binaries (vIDM OVA file) in vRSLCM. It’s nothing more than copied OVA file to /data directory on vRSLCM server and mount it. Of course you can use My VMware to download all Product Binaries but i don’t need them all and what’s worse there is no way to select just one product and add it to binaries:

Ok so let’s do our job in three steps using GUI REST API:
/lcm/gui/api/sourceLink – to add binaries to vRSLCM;
lcm/gui/api/action/createEnvironment – to create new environment in vRSLCM;
lcm/gui/api/action/requestId – to install vIDM.
Table of Contents
Add binaries
So the first step is to copy OVA file to /data directory on vRSLCM. In my case it will be /data/productlinks/vidm/3.3/ and then i will add binaries to vRSLCM.
NOTE!!!
If Location Type is set to Local – the path has to start with /data to LCM could get product binaries.
Just send POST request using JSON object as below (edit if you use different vIDM version):
{
"productName": "VMware Identity Manager",
"productId": "vidm",
"productVersion": "3.3.0",
"productOva": "identity-manager-3.3.0.0-10084102_OVF10.ova",
"sourceLocation": "/data/productlinks/vidm/3.3/",
"productBinaryType": "Install"
}
And the Ansible tasks should look like that:
---
##VARIABLES for all tasks
#VRSLCM REST API
lcmRestApiUrl: https://lcmserver/lcm/api
lcmRestApiLoginUrl: v1/login
#VRSLCM GUI REST API
lcmGuiRestApi: https://lcmserver/lcm/gui/api
lcmGuiRestApiSourceLink: sourceLink
lcmGuiRestApiCreateEnvironment: action/createEnvironment
#vIDM config
vidmOvaRepoPath: "{{ imagesRepositoryPath }}"
vidmOvaFileName: identity-manager-3.3.0.0-10084102_OVF10.ova
vidmDestDir: /data/productlinks/vidm/3.3/
vidmEnvironmentName: vIDM_environment
networkName: vRealize-network
vidmFQDN: vidmServer.vconfig.pl
ipAdress: 192.168.10.5
networkNetmask: 255.255.255.0
defGateway: 192.168.10.1
dnsServer: 192.168.10.10
vidmEnvPassword: P@ssw0rd1234
adminPassword:P@ssw0rd1234
sshPassword: P@ssw0rd1234
adminEmail: admin@vconfig.pl
vidmVersion: 3.3.0
#LCM credentials
lcmAdmin: admin@localhost
lcmAdminPassword: P@ssw0rd1234
#vCenter config
vCenterServer: VCserver
vCenterDataCenter: VCdatacenter
vCenterAdminUsername: administrator@vsphere.local
VCAdminPassword: P@ssw0rd1234
#AD config
domainName: vconfig.pl
---
- name: Create directory
file:
path: "{{ vidmDestDir }}"
state: directory
- name: "Copy vIDM OVA file to LCM"
copy:
src: "{{ vidmOvaRepoPath }}/{{ vidmOvaFileName }}"
dest: "{{ vidmDestDir }}{{ vidmOvaFileName }}"
- name: Log in to LCM to get AuthToken
uri:
url: "{{ lcmRestApiUrl }}/{{ lcmRestApiLoginUrl }}"
method: POST
validate_certs: no
force_basic_auth: yes
return_content: yes
status_code:
- 403
- 200
body_format: json
body:
username: "{{ lcmAdmin }}
password: "{{ lcmAdminPassword }}"
register: resultLogin
- name: Show login status
debug:
var: resultLogin.x_xenon_auth_token
- name: Add binaries
uri:
url: "{{ lcmGuiRestApi }}/{{ lcmGuiRestApiSourceLink }}"
method: POST
validate_certs: no
headers:
Accept: "application/json"
x-xenon-auth-token: "{{ resultLogin.x_xenon_auth_token }}"
return_content: yes
body_format: json
body:
productName: VMware Identity Manager
productId: vidm
productVersion: "{{ vidmVersion }}"
productOva: "{{ vidmOvaFileName }}"
sourceLocation: "{{ vidmDestDir }}"
productBinaryType: Install
register: addBinariesResult
Quick check if all is fine. Just login to the UI of vRealize Lifecycle Manager and navigate to Settings > Product Support:

Create environment
NOTE!!!
lcm/gui/api/action/createEnvironment will return requestID and environmentID. These two values have to be used in the task ‘Install new vIDM instance’.
So let’s create new environment and find requestID and environmentID:
- name: Create new vIDM environment
  uri:
    url: "{{ lcmGuiRestApi }}/{{ lcmGuiRestApiCreateEnvironment }}"
    method: POST
    validate_certs: no
    headers:
      Accept: "application/json"
      x-xenon-auth-token: "{{ resultLogin.x_xenon_auth_token }}"
    return_content: yes
    body_format: json
    body:
      "environmentId": "{{ vidmEnvironmentName }}"
      "dataCenterId": "{{ vCenterDataCenter }}"
      "properties": {
        "enableTelemetry": false,
        "defaultPassword": "{{ vidmEnvPassword }}",
        "adminEmail": "{{ adminEmail }}"
      }
      "products": [
        {
          "productId": vidm,
          "version": "{{ vidmVersion }}",
          "size": small,
          "isNew": true,
          "nodeSize": null,
          "numberOfNodes": 0,
          "enableHa": false
        }
      ]
      "solution": {
        "vvdVersion": null,
        "solutionId": null,
        "size": null
      }
    status_code: 200
  register: createVidmEnvironment
  run_once: true
  delegate_to: localhost
- name: Show requestID
debug:
var: createVidmEnvironment.json.requestId
- name: Show environmentID
debug:
var: createVidmEnvironment.json.request.environmentId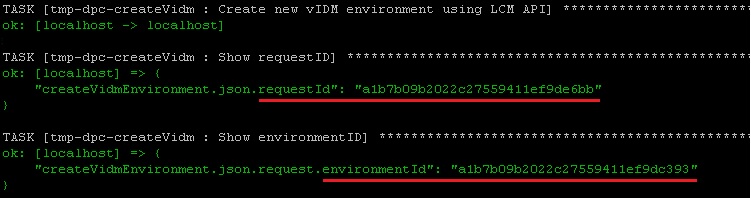
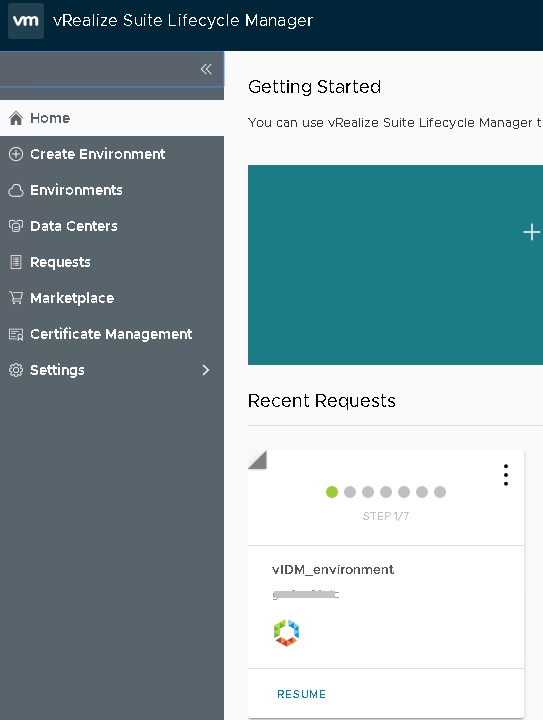
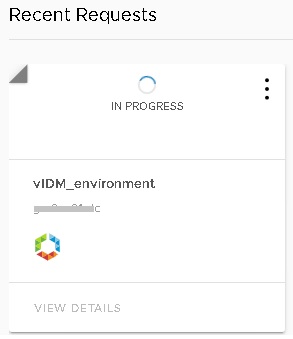
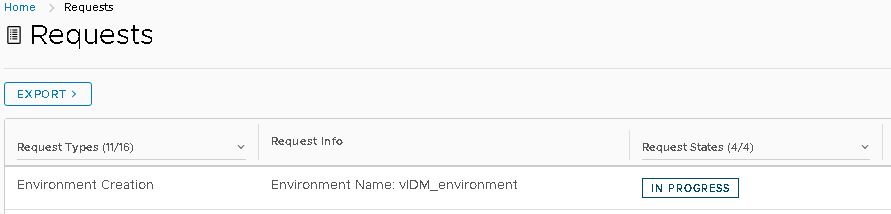
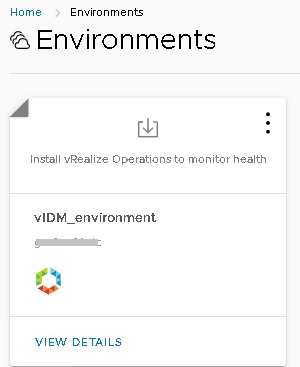
Environment creation initialized:

Install new Identity Manager
And now let’s install it. Because vIDM deployment can take up to 15 mins so i created additional task to check when sshd service on vIDM server start.
- name: Install new vIDM instance
  uri:
    url: "{{ lcmGuiRestApi }}/{{ lcmGuiRestApiCreateEnvironment }}/{{ createVidmEnvironment.json.request.environmentId }}"
    method: PATCH
    validate_certs: no
    headers:
      Accept: "application/json"
      x-xenon-auth-token: "{{ resultLogin.x_xenon_auth_token }}"
      Content-Type: "application/json"
    return_content: yes
    body_format: json
    body:
      requestId: "{{ createVidmEnvironment.json.request.environmentId }}"
      requestorToken:
      requestType: CREATE_ENVIRONMENT
      requestorType: GUI
      requestState: SUBMITTED
      numberOfSteps: 7
      currentStep: 1
      request:
        requestId:
        environmentId: "{{ createVidmEnvironment.json.request.environmentId }}"
        infrastructure:
          sourceLink: "{{ createVidmEnvironment.json.request.environmentId }}"
          properties:
            vrniLicense: ''
            bindPassword: ''
            certificateId: ''
            dataCenterName: "{{ vCenterDataCenter }}"
            vcHostname: "{{ vCenterServer }}"
            productLevelCertificate: 'false'
            environmentId: "{{ createVidmEnvironment.json.request.environmentId }}"
            masterVidmAdminUserName: ''
            netmask: "{{ networkNetmask }}"
            environmentName: GLOBAL_ENVIRONMENT
            clusterName: "{{ vCenterCluster }}"
            enableTelemetry: 'false'
            dnsServers: "{{ dnsServer }}"
            diskFormat: thin
            baseDN: ''
            ntpServer: ''
            vcPassword: "{{ vCenterAdminPassword }}"
            defaultPassword: "{{ vidmEnvPassword }}"
            adminEmail: "{{ adminEmail }}"
            adName: ''
            __variables: ''
            certificateChain: ''
            masterKeyPassphrase: ''
            datastoreName: "{{ vCenterDatastore }}"
            resourcePoolName: ''
            masterVidmAdminPassword: ''
            masterVidmEnabled: ''
            uberAdmin: ''
            license: ''
            privateKey: ''
            bindDN: ''
            vmNetwork: "{{ networkName }}"
            masterPrivateKey: ''
            masterVidmHostName: ''
            groupDN: ''
            masterVidmCloudAdminGroup: ''
            vcUsername: "{{ vCenterAdminUsername }}"
            domain: "{{ domainName }}"
            timeSyncMode: ''
            acceptEULA: 'true'
            folderName: ''
            keyPassphrase: "{{ vidmEnvPassword }}"
            gateway: "{{ defGateway }}"
            searchpath: "{{ domainName }}"
            masterCertificateChain: ''
        encoded: false
        products:
        - sourceLink:
          id: vidm
          version: "{{ vidmVersion }}"
          clusterVIP: []
          properties:
            privateKey: ''
            certificateChain: ''
            keyPassphrase: ''
            certificateId: ''
          nodes:
          - sourceLink: ''
            type: deployvidm
            properties:
              hostname: "{{ vidmFQDN }}"
              rootPasswd: "{{ vidmEnvPassword }}"
              name: "{{ vidmServer }}"
              ipAddress: "{{ ipAdress }}"
              adminPasswd: "{{ adminPassword }}"
              sshPasswd: "{{ sshPassword }}"
          contents: []
    status_code: 200
  register: installVidmEnvironment
  run_once: true
- debug:
    var: installVidmEnvironment.status
- name: Waiting for vIDM provisioning. It can take around 15 mins.
wait_for:
host: "{{ vidmFQDN }}"
port: 22
search_regex: OpenSSH
timeout: 900
register: vidmUpAndRunning
delegate_to: localhost
- debug:
msg: "{{ vidmUpAndRunning }}"
And the task to check that a page returns a status 200.
- name: Check that a vIDM page returns a status 200
  uri:
    url: "http://{{ vidmFQDN }}/SAAS/auth/login"
    return_content: yes
    validate_certs: no
  register: result
  until: result.status == 200
  retries: 60
  delay: 20
- debug:
    var: result.status
And pretty much that’s it. vIDM finally is up and running and what is the most important- fully automated:) You don’t need to touch ‘Setup Wizard’ to complete the installation because it’s already done .

But how to run this role tasks? My playbook run two tasks and looks like that: first task ‘Add binaries’ start role task ‘vidmAddBinaries.yml’ and the second playbook task run role task vidmCreation.yml:
---
- name: Add binaries
  hosts: lcm
  gather_facts: false
  become: yes
  tasks:
    - name: "Running role: createVidm "
      include_role:
        name: tmp-createVidm
        tasks_from: vidmAddBinaries.yml
      run_once: yes

- name: Install new vIDM instance through vRSLCM
  hosts: lcm
  gather_facts: false
  become: yes
  tasks:
    - name: "Running role: createVidm "
      include_role:
        name: tmp-createVidm
        tasks_from: vidmCreation.yml
      run_once: yes
If you want to know how to Ansible role for vIDM configuration i invite you to read Part#2 of this series. First configuration task will change default user attributes.
Cheers.